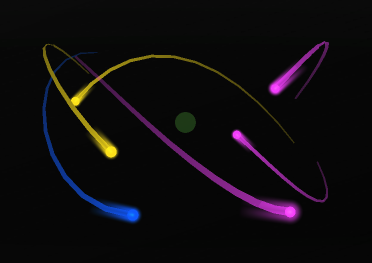
In previous posts we have covered the basics of Metal and how images are rendered to screen. For transparent and semi-transparent graphics, however, rendering the appropriate color can be difficult. Some graphics have transparent backgrounds or are semi-transparent and need to show one or more layers behind them. The comets in Animoog Z are a prime example of several rendering layers being placed on top of each other in 3D to provide an animated scene with glow and transparency to represent a 3D space.
Transparency and Alpha
In computer graphics, alpha represents the opacity of a color. A value of 0 represents fully transparent and a high value represents fully opaque (usually 255 or 1.0). Most people are familiar with alpha from images with transparent backgrounds and from software like Photoshop
When multiple alpha colors are stacked on top of each other, they can be combined using a number of algorithms. In Metal, this process is called Alpha Blending. We will be sticking to additive alpha blending in this post.
Depth and Order
An important concept not covered before in the blog posts is the concept of depth. Depth allows the GPU to determine which vertices and fragments are in front and behind others. The points that are in front (or sometimes at the same depth) are rendered on top and are what is visible in the final rendered image. The rest are discarded and not rendered to screen.
When alpha is involved, the order and how the shaders render is very important. With alpha blending, layers behind the transparent or semi-transparent layer in front must be rendered first so that the colors can be blended when they are layered. If, for instance, you try to render a semi-transparent fragment first, it will not have any other fragments behind it. As a result, it cannot alpha blend with any other colors. And, if a later rendered fragment is behind the semi-transparent fragment, then it will not render because it believes it is blocked. Instead, fragments in back should be rendered first so that when the semi-transparent fragment is rendered, it can alpha blend with what’s behind it.
One way we can get around these depth concerns is to disable the depth state temporarily. This puts all the newly rendered fragments on the same level, so fragments are always alpha blended. So, for fragments like the glow of the comets, we render all the opaque elements first and then disable the depth state so that the glow can all be applied, no matter the depth.
Animoog Z Comets
The following is how we render a single comet in Animoog Z.

First, we start with the comet position and draw a circle. We start with the depth state on and make sure the dot is always the fragment closest to the camera.

Then we add the tail. The tail is opaque and made up of triangle segments that get smaller and darker as it gets further in the tail.

Next we draw the coma (fuzzy glow around a comet). This layer is semi-transparent. In order to avoid the coma being put behind this or any other comet, the depth state is disabled. In this way, this semi-transparent glow will be alpha blended with any of the existing comets and other comas to provide a glow without clipping or cutoffs.

The Coma tails are added last and the size and length of them depends on the speed of the comet. They are also rendered with depth state disabled.

Together these layers render a comet every frame that changes 3D position as it flies through the 3D wave grid.
Conclusion
This just scratches the surface of how alpha layers can be combined to create more complex animations and renderings. Whether it is several images on top of each other, a comet flying through 3D space, or layers of smoke in a video game, these layers can come together to make a more natural and immersive experience in apps.